I recently decided to upgrade my home security camera system to a cutting-edge 12mp 4K PoE system. As with many homeowners, I previously used a lower-
I recently decided to upgrade my home security camera system to a cutting-edge 12mp 4K PoE system. As with many homeowners, I previously used a lower-resolution Wi-Fi-based system. However, due to the recent increase in home invasion robberies and the use of Wi-Fi jamming devices, I felt the need to enhance my security. In this article, I will guide you through the products I selected, the reasons behind my choices, and the installation process. For security reasons, I will not disclose the location, but that information is not necessary for the purposes of this article. Even though I do provide Amazon links to the products I used, in no way do I suggest that you need to buy them from Amazon, and I receive no compensation from Amazon if you do.
A couple examples:
https://youtu.be/1ASM1c4uL7o?si=5ApEJjKsKn-Jov1_
https://youtu.be/kfaFT20oMZ0?si=NtaE0pCGlg6GGNlk
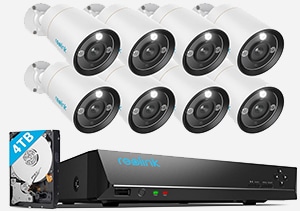
The system includes a single 4TB drive for recording storage, but as I’ll be recording at full 4K resolution on eight cameras, space will fill up quickly. The system can accommodate two drives and supports upgrades to 6TB drives. I’ve purchased two 6TB DC HC310 Drives, each costing $60. (Amazon: https://www.amazon.com/dp/B081KQ17R3?psc=1&ref=ppx_yo2ov_dt_b_product_details) I strongly suggest this upgrade for extended recording retention. Once the drives are full, the system overwrites the oldest recordings first, continuing in a constant cycle. With the two 6TB drives, I achieve approximately 45 days of retention.
In my setup, I have a network rack in my garage which serves as the entry point for my ISP and distributes connectivity throughout the house. I wanted a 40″ 4K monitor in my office to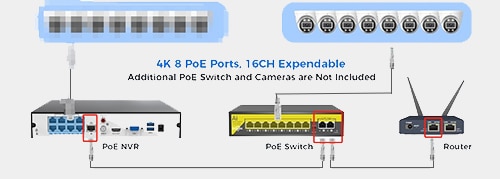
You might be curious about my choice of CAT6A shielded cable over the standard CAT6. The primary reason is that CAT6 only supports 10 Gbps speeds up to 55 meters (164 feet), and two of my cable runs exceed this, reaching nearly 300 feet. Additionally, CAT6 operates at 10 Gbps on 250MHz, whereas CAT6A can handle 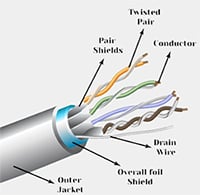
While CAT7 or CAT8 were options, terminating CAT6A is already quite challenging, and I preferred not to complicate the project further. I decided to go with TrueCable CAT6A Shielded Riser, 750NHz, PoE++ at a cost of $318 for 1000 feet. (Amazon: https://www.amazon.com/dp/B07LCXTFVH?ref=ppx_yo2ov_dt_b_product_details&th=1).
The Challenge of Using This Cable Type
When it comes to this particular cable, flexibility is a bit of a double-edged sword. On one hand, it offers robustness and durability, but on the other, it can be somewhat rigid. Here are the key points to consider:
- Flexibility and Sharp Turns:
- The cable’s inherent rigidity means that making sharp, easy turns can be tricky. Unlike more pliable cables, this one doesn’t gracefully bend around corners.
- Imagine trying to navigate a tight space or route—this cable might resist your attempts to create those sharp angles.
- Termination Challenges:
- Terminating this cable can indeed pose a challenge. The thicker wire (23AWG) compared to regular CAT5 (24AWG) means you’re dealing with a slightly bulkier conductor.
- When terminating, you’ll need to ensure proper connections without damaging the wires or compromising signal integrity.
- The AWG Factor:
- That seemingly minor difference of 1 AWG (American Wire Gauge) can have a significant impact. The smaller the AWG number, the thicker the wire.
- Trust me, when you’re working with your fingers and hands, that extra thickness can make a noticeable difference. It’s like threading a needle with a slightly thicker thread—it requires a bit more finesse.
The Nifty Tool: Fear not! I’ve got a handy little tool up my digital sleeve that will come to your rescue. It’s designed specifically for straightening wires, making the termination process smoother and more efficient. This Network Cable Untwist Tool will be your friend 😊 The best $10 you will ever spend! (Amazon: https://www.amazon.com/dp/B0B3J46BFJ?psc=1&ref=ppx_yo2ov_dt_b_product_details)
A few tools that you are going to need when terminating CAT6A cable is the following: a crimping tool specifically that will handle CAT6 RJ45 cable, Wire Stripper, Diagonal Cutters, and of
This Diagonal Cutter is excellent (Amazon: https://www.amazon.com/dp/B07GR7QF63?psc=1&ref=ppx_yo2ov_dt_b_product_details).
Network Wire Straightener (Amazon: https://www.amazon.com/dp/B0B3J46BFJ?psc=1&ref=ppx_yo2ov_dt_b_product_details).
Wire Stripper (Amazon: https://www.amazon.com/dp/B08LT8Q23G?psc=1&ref=ppx_yo2ov_dt_b_product_details).
Since I would be installing these cameras outdoors on the home, I decided to purchase heat shrink tubes to place over the ethernet connections to the cameras to protect them from the environment and pests. (Amazon: https://www.amazon.com/dp/B01N101096?psc=1&ref=ppx_yo2ov_dt_b_product_details). The use of these is to your discretion but I highly recommend you go the extra step now so you are not replacing connections in a couple years because of weather damage!
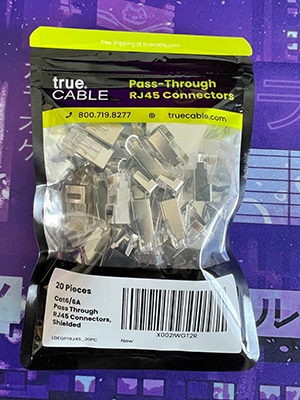
When terminating cable shields to jacks, consider using copper fabric strips. These unassuming components play a significant role in ensuring proper grounding and shielding. Here’s why they matter:
Copper Fabric Strips: These strips, available from TrueCable, are surprisingly durable. Despite their small Despite their small size, they provide robust support for the aluminum shield. Without them, the aluminum shield can easily tear away. You can find these strips on Amazon for just $15 per pack of 100.
Shielded CAT6A Cable: If you’re working with shielded CAT6A cable, skip the drain wire (usually found inside the cable). Instead, use the aluminum shield itself. The copper fabric strips will help keep it securely in place.
Non-Shielded CAT6A Cable: For non-shielded cables, wrap the drain wire around the cable and cover it with the copper fabric. This makeshift shielding method can enhance overall performance.
From here it is just a matter of running your cabling, terminating the ends, I wired mine using T-568B for the best performance, connecting one end of each to cable to the PoE switch, and the other to a camera. Rinse and repeat until you have all eight cameras wired. If you have gotten everything correct when you plug in the camera the REOLINK NVR will automatically add the camera. If not, then you will need to do some troubleshooting that is where the RJ45 tester will come in handy to see if you have any crossed wires, shorts, or broken wires. There also many different Ethernet cable testers on the market, some that will even tell you where exactly along the length of the cable you have a break or short.
One last suggestion, since you have gone to this much expense and trouble installing a 4K capable security camera system, then don’t skimp on the monitor or TV you use, get a 4K model to get the full benefit of your hard work!
How good are the results? See for yourself, let’s zoom in on the wheels of the car 😉


COMMENTS
I did end up replacing two cable runs because of a short, must have been a staple! So be extra careful when doing your runs.